Tuesday, April 29, 2008

Spice Weasel Pattern!

Alright, my latest invention: spice weasel lip balm cozy! That's right. Now, while I don't necessarily see the use of a lip balm cozy, who can object to a spice weasel lip balm cozy? It gives you an excuse to shout "BAM" really loudly, in any case. Here's the pattern.


Materials:
Spice Weasel colored yarn
A scrap of white/beige yarn
Size 10 pink crochet thread
One keyring
Googly eyes

TAIL:
With white/beige yarn
ch 2
Row 1: 3 sc in 2 ch from hook
Row 2-3: even sc
change to spice weasel color
Row 4-6: even sc

BACK LEGS: Make two
With spice weasel color
ch 2
Row 1: 6 sc in 2 ch from hook
Row 2: (sc in next st, 2 sc in next st) twice, 2 sc
Row 3-5: even sc
BO, leave a long tail to secure to body

FRONT LEGS: Make two
With spice weasel color
ch 2
Row 1: 4 sc in 2 ch from hook
Row 2: (sc in next st, 2 sc in next st), 2 sc
Row 3-6: even sc
BO, leave a long tail to secure to body

MAIN BODY:
With spice weasel color
ch 2
Row 1: (sc in next st, 2 sc in next st) until you have about 17 sts (or as large as it needs to be to fit your chapstick--I used Burt's Bee's as a measurement)

Around Row 4, sew in the tail, it will be easier to sew in now than when the body is complete. Make sure you secure the tail very tightly, because this is where the keyring will go.

Crochet even rows until the body is about 2-2 1/2 inches. BO. Sew in the two back legs and the two front legs.

HEAD:
With the pink crochet thread
ch 2
Row 1: 6 sc in 2 ch from hook
Row 2: (sc in next st, 2 sc in next st) three times
change to spice weasel color
Row 3: even
Row 4: increase until you have the same amount of stitches as the body--in this case, it was 17 sts.

Continue with even rows until the head is about 1-1 1/2 inches long. Attach the head to the body.
I attached it at the top of the head, so that his neck opens to reveal the chapstick. I just whip stitched the two pieces together, spanning an area of about 10 sts on the top of the head.

Now it's time to attach the eyes--this is how I did it.
I cut out two very small pieces of black felt, which I stitched to the head using invisible thread. I then used Gorilla Glue to glue the eyes onto the pieces of felt. You can just use black felt if you want, or you can try and glue googly eyes directly on the yarn, although I'm not sure what the effect would be.

Details:
Cut three small pieces of yarn to use for his little tufts of hair. I poked these through the neck; they just have a knot on one side.

Use a tiny piece of black thread to make the nostrils, secure with a knot inside the head.

Attach the keyring to the tail.

You should be done! I'm sorry if this is kind of confusing, I was trying to be as detailed as possible, but with so many small pieces I know it can get a little messy. If anyone makes one, I hope you post pics!


Another custom order

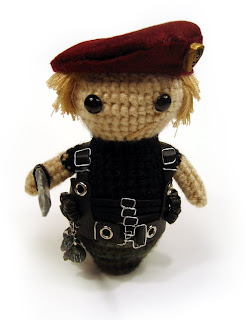
We've been so busy in the last couple of days! There are still a couple of more custom orders to fill, but I wanted to show everyone the newest amigurumi. His name is Jack Krauser, and he is from the video game Resident Evil 4. Now, I'll just confess right here, I've never played RE4 even though it was supposed to be one of the only good games for the Gamecube (besides Melee, of course). I don't like horror games, or suspense games. I think it stems from a time long ago...let me tell you about it. And then pictures, I swear! Or you could just skip this part.

Dark Forces had just come out for the PC, and I was playing it nonstop. I was relatively young when this came out (maybe 12?) and I would spend all night playing it. One night, when I was playing, I fell into the water and there was a creature in the water that tried to eat me but I couldn't see it when I fell in the water and you couldn't see it from above the water swimming around and it was dark and the water was dark and it was big and I was scared. It scared me so badly that I can't swim in any video games ever and I hate things that pop up out of nowhere and scare me. There. That's my traumatic story.

Oh yeah, here are some pictures. Resident Evil 4. Jack Krauser. Here ya go.
Can you see the scar? He has a little scar over his left eye. It's light, but you can see it better in person.
His belt was super hard to make. Of course, sewing through leather is always going to be tough but this one was a doozy. I am so happy with how his beret turned out, I was really worried that the shaping wouldn't be right but we punched it and pinched it until it came out perfectly. It even has a little pin that is removable. His little grenades unclip too, and his dagger can be taken off his hand. I love versatility! More pics on my flickr as always.

Anyway, stick around. I made a spice weasel and I'm planning on putting the pattern up here later, but I might not get to it until tomorrow. He's super cute! Plus, he's actually functional--not for spice, of course (although I am making one that will be!) but for something else--I'm not going to spoil it.

Saturday, April 26, 2008

Lord of the Rings custom orders

I wanted to share with you guys the two custom orders we just finished. They are SO COOL.
It's the Witch King of Angmar! He's so evil, yet so cute at the same time. Okay, maybe more evil than cute. We didn't want to make the sword look corny and like it is on fire, so it is tinged red to make it sort of firey looking.
That's right, he has a mace too. The pictures don't really show it, but his coat is all tattered and ratty looking, and he has little spikes on the back of his arms. He is really super cool, he turned out really awesomely. We were worried about how his face armor was going to turn out, but it is so cool and so spikey. (I'm still a little excited about finishing him, so I'm not very coherent in my thoughts yet).

And our other creation:
King Aragorn! I love the tree of Gondor, so any little guy with the tree on his armor is all right in my book. I think Aragorn turned out really well though. He has a lot of painting done on his coat.

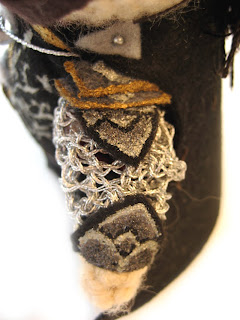
The silver stuff on his arms is supposed to be chain mail (I hope you can tell). I just crocheted it out of silver thread. I like the effect it gives, rather than just using silver yarn. He also has shoulder armor on:
Ah! He turned out super cute. The eye placement is really important when you make amigurumi dudes, and his eyes turned out really well. If you don't place them correctly, you can end up with slightly retarded looking amigurumis.

Anyway, I hope you guys like this latest batch! I'm really happy with how they turned out. I'm working on some more custom orders right now, but I also finished some more dudes to put up in the shop. I'm really excited about the new custom orders too though, I'm not sure with how they'll turn out but I am super excited to work on them.

Hope you guys enjoyed!

PHOTO OP:
Poor Frodo!

Cooking Mama Apron

I just wanted to share with everyone this adorable cute apron that craftster user crafterbation made.
I like the little pocket on the side with blue lace around it, and it says "Don't worry, mama will fix it". Crafterbation says that the apron is constructed using double sided sticky interfacing. I like the idea of using sticky interfacing, it makes the felt look a lot cleaner than if it was stitched.
So smooth! My felt is always pockmarked because of the stitches, I might have to try this method and see if it comes out any cleaner.

Even though I didn't really care for Cooking Mama all that much, I can still appreciate the cuteness behind the sentiment of this apron. I think it's adorable! Once again, something that is useful can also be really cute and nerdy. Although I have to say that I would be very paranoid about getting this apron dirty.

I have been watching Arrested Development all day and making little dudes, so I'll have some awesome pictures to share with everyone tonight!

Friday, April 25, 2008

Legend of Zelda crafts

I've been posting so much stuff that I've been doing lately, that I haven't had time to post other cool stuff that's out there! So today I'm going to post some awesome Zelda related crafts. I'll put out a disclaimer: I'm not the world's hugest Zelda fan. In fact, I only like Wind Waker/Phantom Hourglass (although I CANNOT and WILL NOT go through that stupid Temple of the Ocean King one more time! I seriously won't!) even though my boyfriend claims that Ocarina is the best game ever (why won't Link jump? Normal people can jump. I would take a small hop). I really like Wind Waker though, even the really boring sailing parts. And my best character in Brawl is Zelda, if that counts. Anyway, hopefully my non-Zelda obsession won't stop anyone from looking!

First off: This Wind Waker cake.
I can't believe how amazingly detailed it is! Can you see the little Link and Tetra/Zelda up at the top? And I love the little dragon boat down at the bottom. There's more information here if anyone is interested, although there is no mention of who made the cake, just that it is a custom made wedding cake. Can you believe it's a wedding cake? So cool.

For those of you who love game cakes as much as I do, check out this game cake site which is totally geared toward, you guessed it, game cakes. Some are an awful mess, but some are awesome masterpieces. Check it out.

Secondly: This cutting board.
There is nothing I like more than a geeky thing that is also useful. It is for sale on etsy here but at $125.00 I think I'll force my boyfriend to make me one instead. The same seller also has a really cool space invader cutting board too. I don't know if I would ever use it though, it looks too pretty. I love the dark wood used though.

Thirdly: An octorak!
This is from etsy too, you can see more pictures here. I'm not really sure what it is made out of, but I think the seller made it out of a pot! And a lot of sculpey of course. Now that is creative. And the rock is removable.

If anyone has any other Zelda related crafts they want to share, feel free to leave a message! I know there's lots of stuff out there, so share the love!

PS-If I haven't been posting much, it's because I've been wasting my time playing this stupid game. I'm a sucker for typing games, I don't know why.

Tuesday, April 22, 2008

Futurama!

And now, a grotesque stinking lobster!
I think he's very cute. When I saw this color yarn in the yarn store (Woolie Ewe! It's awesome) I knew I had to make Zoidberg. You can't really see in this picture, but he has little claws instead of normal hands. They were pretty hard to make, but I think it turned out alright.

I like his head mirror too, I think it's really cute. It can come off though, so he doesn't always look so professional (yeah right).
He got in the garbage again! Eating fish bones. Tsk tsk.

And here's the other Futurama character I made:

Everyone said his head needed to be taller, but I think he's cute like this. I like his little ears. I don't know why the color is so washed out here, but his uniform is a maroonish color.

I think this might be all of the Futurama characters I make--the rest don't turn out so well, so I think I'll just stick to these aliens. I'm working on the Firefly cast right now, and another stand-alone character from some movie (I'm not telling what movie). I'll do a teaser of him later--you'll never guess who it is this time!

Monday, April 21, 2008

Short Hair Tutorial

Okay, everyone wanted a short hair tutorial, so here it is!

Step 1:
You're going to need 2 strands of embroidery floss and 2 pieces of cardboard, one measuring 4x3 inches, and the other one measuring 4x1 inches.

Step 2:
Wrap one whole strand around each piece of cardboard. I'm going to call the small, skinny long piece (on the right) the bottom piece, and the bigger one (on the left) the top piece.
Step 3:
Carefully take the floss off of the cardboard and tape the floss to make sure it won't move too much when you sew it.
Step 4:
Now use a machine to sew between the tape. (You don't need to worry about the color of the thread in the sewing machine too much. I use a brown thread for any hair color that isn't blond, because it doesn't need to exactly match the color of the embroidery floss) For the bottom piece, just sew a line as close to the top as you can. Don't sew over the tape, or you will never be able to pull it up. Be careful here, because my sewing machine, at least, wants to pull the hair apart, even though it is taped. Just feed the hair through without letting the machine pull it out of shape.
Step 5:
VERY CAREFULLY pull the tape off of the hair. Make sure to hold down the hair when you pull the tape off, because it will rip out all of your stitches if you just pull. It will kind of pull the embroidery floss apart, but don't worry, just use the other side when you stitch it on the amigurumi's head.

Step 6:
Place the bottom piece of embroidery floss on the amigurumi's head, like in the pictures. Try and make it as even as possible on the sides, and don't let it get too low in the back. Sew it in place with either invisible thread or a matching hair color thread. I always use invisible thread, but a matching color thread works just as well.


Step 7:
Now place the top piece on the head. Make sure that it covers the seam from the other hair you just put on. You can always tug at it a little to cover everything if you made it a little small. Sew this piece into place as well.
Step 8:
Cut all of the loops out of the hair. Make sure you cut both the top and the bottom pieces of the hair. Cut the hair as short as you want, but make sure the top piece is always long enough to cover the seam of the bottom piece. Don't cut in a straight line, try and mess it up a little to make it look more natural. You can also try and make it more even than I did, lol.
Viola! You're done. I hope this was easy to understand. If anyone has any questions, feel free to leave a comment here or e-mail me at artoo1121 at gmail.com.

Sunday, April 20, 2008

User creation

I just wanted to share with everybody a Gandalf that Jenny made from my patterns. She couldn't find the gray felt for Gandalf the Gray, so she made Gandalf the White. The staff is awesome--my boyfriend just made a Gandalf the White staff a couple of days ago, and he says he's going to have to remake it now because he saw how awesome this staff was.

Isn't he cute?! She placed the eyes (and eyebrows) really well, if those aren't placed correctly, the little guys can end up looking really wonky. Or really angry, depending on where the eyebrows are. Anyway, I loved seeing someone make one of the Fellowship members from my pattern! I just had to share.

I am planning on having a hair tutorial up tomorrow, so stay tuned!

Tuesday, April 15, 2008

We named the dog Indiana!

Alright, so it wasn't much of a teaser (too obvious, it'll be harder next time, bwahaha!) so here are the finished pics of him. I think he is SO cute.

Ah! Isn't he adorable? The boy made all of the accessories, as usual, the holy grail, magic stones, and the golden idol (did you guys realize that the guy that took the golden idol from Indy, and then got a spear through the head, was Alfred Molina? No one believed me!) and I made the whip. I was most worried about his hat, but I think it turned out great.

I wanted his undershirt to only have one arm, unfortunately I'm not sure the felt looks distressed enough. I KNOW that his shirt isn't open enough, I wanted him to be kind of risque, but the boy told me to sew it down so it doesn't flap too much. But he still turned out so cute! He looks like he's been in a really tough, yet clean, fight.

We didn't make his gun, because we thought it would clutter up the whole look too much. I think he looks great the way he is, though. I made up a new method for the hair, so it can be cut shorter, and I think it turned out really well.

It looks like he doesn't have a hand, but he really does. Anyway, let me know what you think, if anyone's out there!

Monday, April 14, 2008

Teaser

Alright, can anyone guess what I've been working on?
Okay, I guess it's kind of obvious. But it's going to be so cool! I should have pictures of the complete "mystery person" in a couple of days.

I'm also working on a custom order from Lord of the Rings, and let me just say one word--AWESOME. He is going to be soo cool. Stay tuned!

Thursday, April 10, 2008

Custom Order: Boushh

Alright, the reason it's been a little quiet in here is because we have been working like crazy on making these little dudes. Most of them are Lord of the Rings characters, but we did get to do a custom order for Boushh, the bounty hunter in "Return of the Jedi" that Princess Leia dresses up as. I thought you guys would like to see some pictures!
He he! I know she's a little funny looking, but it's mainly because of the angle. And Boushh is kind of weird looking anyway. But the helmet is completely awesome. The boy really outdid himself on it. She also has her spear and a thermal detonator.

Okay, and get this--she has a magnet in her hand, and there's a magnet in the thermal detonator, so she can actually hold it! It's not completely stable, because cooking a magnet inside of the sculpey kind of weakened the magnet a little, but it's enough to stay unless you're rough with it.
And of course, like Darth Vader her helmet comes off. I think she's pretty adorable, I was really sad to see her go away this morning. Since it was a custom order, I didn't make one for myself, and the boy says the helmet was so hard he doesn't want to make another, so I may not get one. Let me know what you guys think!

And one last artistic shot of Boushh and Chewie, reenacting a scene:

On another note, I have Zoidberg finished! I just have to make his jacket and he'll be ready. He is super cute. Maybe too cute for someone who is supposed to be a grotesque stinking lobster. But I digress. I'll post pictures when he's ready.

Monday, April 7, 2008

Maniac Monday! Okami Style

Let me just put this out there--Okami is the best game ever created for any platform ever. There. I said it. If you have a Playstation 2 (or a Wii, the port version is coming April 15 and if I have any money left after taxes I will buy a second copy for the Wii) and you don't have this game, you have to stop reading this right now, go get it, play it, and then come back. See you in 40 hours.

And if you don't have those consoles, or if you still want to see some amazing crafts, stay here. On to the crafts!


1. The most awesome quilt ever created. The woman who made this also made a slightly less awesome but still really kickass awesome Wind Waker quilt. Alright, they're both awesome. I love Wind Waker too. She is probably the coolest mom on the block and the envy of all the neighbor's kids. I'm actually glad she doesn't sell these, because I would spend untold amounts of money to own this. For those who aren't familiar with quilts, this is called a stained glass quilt. And no offense to those who are quilters, but this is WAY COOLER than pinwheels.

2. It's not often you see video-game related jewelry, but this is pretty sweet. Etsy user Whitey594 is selling some like this here and it looks like he/she makes a custom necklace based on your favorite glaive and beads. If you haven't played Okami, those are the weapons that you get throughout the game--and they are all beautiful. I would like to have any of them on a necklace (if I would only wear jewelry).

3. Lastly, these pictures, sold by Etsy user Zamtionary. I'm not exactly sure what they are, (cards of some sort? Maybe just laminated pictures?) but they are the most adorable little drawings of the characters. Of course, Okami has some of the most beautiful artwork that I've ever seen in a game, but when it is chibified, it just makes you want to go "awwwwww".

And I leave you with a fearsome wolf!

Saturday, April 5, 2008

Darth Vader

Alright everyone, time to unleash Vader! The Imperial March is now playing in your head.
He's pretty sculpey intensive, not so much for me to do this time. The boy did most of the work: helmet, voice box, belt details, and lightsaber. Pretty crazy, huh? Okay, and get this:
His helmet comes off! And his lightsaber can "turn off" too. The lighsaber beam is a little skewer, painted red, and it has a little hole in the lighsaber that it sits in. Isn't that so cool? Those pink things on his head are supposed to be scars, but I'm not sure they turned out exactly how I wanted them. They do look better in person though, this pic is kind of washed out.
That detail is insane. It's all painted sculpey, of course, but everything is carved, too. And they all have metal loops on the back of them, that's how they are attached to the belt. The lightsaber clips on, too, by a little earring hook.

Anyway, let me know what you guys think! I think I will have my Ackbar and Yoda pattern up for sale tomorrow, and I am working on a custom order for someone--I will post pics when it is shipped out, but it is going to be insane. Of course, another sculpey intensive project, so I have relatively little to do, but that is going to make it that more impressive. Stay tuned!

Thursday, April 3, 2008

News

This week has been so crazy! I have been making amigurumi figures all week, non-stop. I was interviewed this week by Bonnie who runs the official Star Wars blog. So cool! You can read the interview here. My etsy shop sold out pretty quickly after that, so I've been trying to build the stock back up.

I was also interviewed by My Wooden Robot. It was so much fun to do! You can read that interview here. This interview is a little longer, mainly because I rambled on forever. I can't stop talking about these little guys. I'm so proud of them.

Darth Vader will be done tonight, hopefully I will have pictures tomorrow. And let me just say Luke is going to be awesome. I simply cannot wait to show you the surprise I have for Luke.

And so I leave you with this picture, have a nice day everyone!
Peep Wars!